| |
Hardwood Flooring Installation Guidelines |
|
| |
McCurley’s Floor Center is one of the leading providers of quality hardwood flooring at discount prices. We offer professional installation in most Bay Area cities and have over 40 years of experience providing consumers, retailers, contractors, builders and designers with hardwood flooring products.
Our warehouses and showrooms in San Ramon and Concord offer a full line of hardwood flooring products including:
- Pre-finished and unfinished hardwood flooring
- Solid and engineered hardwood flooring
- Parquet hardwood flooring
- Floor care and maintenance products and accessories
- Standard and exotic hardwood species such as Brazilian Cherry, Walnut, Maple, Santos Mahogany, and Maple among others
Our nation wide distributor channels allow us to provide you with almost every hardwood flooring product and accessory on the market today at the lowest prices available. Get a free estimate today! |
|
| |
Hardwood Flooring Acclimation:
Before any wood is delivered, the jobsite should be checked to determine its readiness. Wood should not be delivered if jobsite moisture conditions are excessive. This leads to the absorption of moisture and should be avoided.
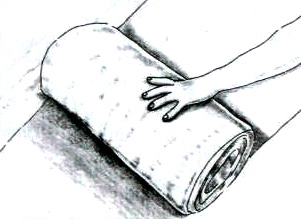
Interior climate controls should be operating for at least 48 hours to stabilize the moisture conditions of the interior. Once at the jobsite, the wood should be set indoors and spread over the subfloor. Three to four days should pass before installation is started. Moisture contents of both the flooring and the subfloor must be checked and recorded before any work begins
Pre-Installation:
Prior to the installation of hardwood floors the building must be enclosed and structurally complete, including exterior doors and windows. Concrete, masonry, paint, and drywall must also be complete and have been allowed adequate drying time, as these can raise the moisture content within the building. |
| |
|
| |
The Three Methods of Hardwood Flooring Installation:
When most people think about installing wood floors, they typically envision a hammer, nails and a lot of back-breaking work. There are, however, several options available, and choosing one will depend on which flooring is used, whether it is installed above or below grade, and the subfloor material. Basically, there are three methods used to install hardwood floor: nail down, glue down, and floating. Following is a brief description of each of these methods. |
| |
|
| |
Nail Down Hardwood Floor Installation:
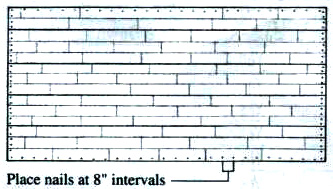
Nailing down hardwood flooring is the most common flooring installation method. This process, also called blind nailing, is one in which the nails go through tongues and are not visible. The nail down method can be used for the installation of both engineered and solid hardwood flooring. For nailing patterns follow the manufacturer's installation instructions. Usually the nail spacing should be 8 to 10 inches long for solid hardwood flooring, and 4 to 8 inches long for engineered hardwood flooring.
|
 |
|
| |
When installing hardwood floors using the nail down method be sure not to use too many or too few nails. Too many nails may cause breaking of the tongues, and too few may cause squeaks or cracks on the floor. |
| |
|
| |
Staple Down Hardwood Floor Installation:
With this method 1-1/2 to 2 inch staples are used instead of nailing cleats to attach the wood flooring to the subfloor. This method is both fast and easy to use. |
| |
|
| |
Glue Down Hardwood Floor Installation:
The glue down hardwood flooring installation system involves using adhesives to glue wood planks to the subfloor. When installing hardwood floors over concrete it is recommended to use moisture-cured urethane adhesive for a better result. There are three categories of hardwood flooring adhesive available: water-based, solvent-based and moisture-cured adhesive. |
| |
|
| |
Floating Hardwood Floor Installation:
Floating hardwood installation is the method in which the flooring is not fastened to the subfloor. Boards are glued to each other at specific tongue and groove points. The subfloor durability must be checked however, as the glue holding the tongue and grooves together could deteriorate and break over time if it is too weak. This method also requires additional padding.
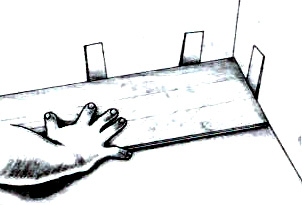
Subfloor evenness is very important with floating hardwood installation. Any variation in the subfloor level will result in soft spots within the floor above. These soft spots will in turn create stress on the tongue and grooves that could result in integrity failures. Make sure that subfloors meet industry standards for maximum variations of 3/16" within a 10" radius. Floating floors expand and contract as a whole unit. Contrary to floors that are glued or nailed, this expansion is not restricted by anything; therefore, it is important for installers to leave sufficient room for the floors to expand. |
| |
|
| |
Radiant Heat:
Most hardwood floor manufactures do not recommend installing hardwood floors over radiant heat systems. However some manufacturers, like Shaw, Hallmark do produce engineered hardwood floors that are approved for installation over radiant heat systems. These come in various species such as oak, ash, hickory and walnut and are usually less than 3/4”. They are installed using the floating or glue down methods. The nail or staple down methods of installation are not recommended for radiant heat floors as minor gapping between plank floors is normal. All hardwood floors over radiant heat systems need to be installed according to the manufacturer's installation instructions. |
| |
|
| |
Guidelines for The Installation Of Hardwood Floors Over Radiant Heat Systems:
There are several standard techniques, guidelines and procedures to ensure the successful installation of hardwood floors over a radiant heat system. These are as follows:
- The subfloor temperature should not exceed 85F
- The indoor temperature should be maintained between 60-80F
- The humidity range should be between 35% to 65%
- Radiant heating systems must be set at room temperature with a minimum of 64F 4 days or more before hardwood delivery or installation
- The subfloor moisture content should be less than 14% before installation of hardwood flooring
- Concrete subfloors must be dry and the PH level of the concrete should be between 6 and 9.
- The hardwood flooring must be stored and acclimated inside the room for a minimum of three days before installation
- The heat setting of the radiant heat system should not be changed for 48 hours before or after installation
|
| |
|
| |
Guidelines for the Installation of Standard Wood and Hardwood Floors
Hardwood flooring is a beautiful product of nature characterized by distinctive variations in grain and color. As flooring material hardwood is superior to carpet and laminate or vinyl in both durability and elegance. Proper hardwood installation is a key factor for protecting your investment. McCurley’s Floor Center and www.MacFloor.com has over 40 years of experience in providing and installing hardwood flooring. We can help you every step of the way to ensure your satisfaction in selecting, purchasing and installing your hardwood floor. |
| |
|
| |
STEP 1 of Hardwood Flooring Installation
- Upon receiving your hardwood flooring check the purchase order to verify that the style and color match those on your hardwood labels.
- Inspect the color and finish of hardwood flooring before installation.
- Make sure the condition of your subfloor meets or exceeds all of your installation instructions.
- Hardwood flooring is a natural, organic products and defects in the flooring can occur in the manufacturing process. Allow 5% to 10% extra flooring to handle the waste factor for random plank hardwood installation. Other pattern installation, such as diagonal, may require more.
- Order hardwood filler or putty to correct minor flooring defects.
- Hardwood floor should not be installed in a new construction site without heating and air systems. The heating system should be fully operational and maintain room temperature between 60 – 80 F with a humidity range of 35% - 65% 5 days prior to wood acclimation.
- Hardwood floor should not be delivered or install until concrete and plaster completely cured at least 60 to 90 days ago.
- Basements and crawl space should be dry and well ventilated.
- To avoid access of moisture we recommend a minimum of 6 mil vapor barrier to be placed on ground surface.
- Hardwood flooring should acclimate at the job site minimum 48 hours before installation
|
| |
|
| |
STEP 2 of Hardwood Flooring Installation:
- Remove existing molding including wall base, Base shoe, and thresholds.
Undercut door casings.
- Clean subfloor, subfloor should be scraped or sanded, free of paint, oil, grease or any debris.
- Subfloor should be even or flat with in 3/16” over 10” and/or 1/8” over 6” sand high area & fill low spots.
- If the subfloor is plywood or equitant, high areas or joints can be sanded, low spots can be flattened by using shims.
- Subfloor must be property secured use nails or screws.
- Moisture tests must be done.
- Walls or cabinets should not be installed over hardwood flooring, especially with hardwood floating installation system.
- Remove flooring from several different boxes for proper color and shade mixture.
|
| |
|
| |
STEP 3:
- For glue down hardwood floor Provide Recommended Adhesive.
- For nail down hardwood floor use 15# asphalt paper
- For Floating Hardwood installation use foam/rubber underlayment.
- Tape all seams & joints.
|
| |
|
| |
STEP 4:
FLOATING HARDWOOD FLOOR INSTALLATION:
Glue the short end and long side grooves and position the next board, matching the tongue and groove at the end only, then beginning at the opposite end of the board, tap the board onto the previous row with the tapping block. Move the tapping block back toward the right side of the board until you get near the connections with the previous board.
|
 |
|
| |
|
| |
Before you finish tapping the board onto the previous row, you must be sure the end joint is tight. If the end joint is not completely tight you will not be able to do so once the long seam is tight.
Continue with additional boards, cut the last boards to fit and use the last board puller and tapping block to install it as shown previously. Continue with the next row, as long as the piece remaining from the previous row is at least 12” and maintains the end joint offset from the previous row of at least 16” |
| |
|
| |
The Last Row
The entire length of the last row in most cases will need to be cut to fit into the remaining space while allowing the ½” expansion space. The last board puller will be used to install the last row. |
| |
|
| |
STAPLE-DOWN INSTALLATION
Underlayment Layer
Once the subfloor is dry, clean and flat, install the red rosin paper or 15lb asphalt paper. tape all seams completely with underlayment seam tape.
Position the First Row
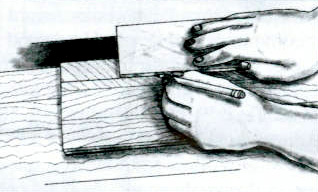
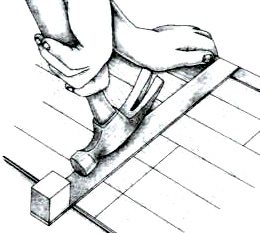
Begin installation the first row in the right corner of the base wall. Install the first board so the short grooved side is against the ½” expansion shims to your right and the long grooved length of the board is against the ½” expansion shims in front of you. Apply tongue and groove glue to the end of the second board. Connect the end of the second board to the end of the first board, make sure the boards are rightly connected and firmly positioned against the shims. Use the hammer/rubber mallet and tapping block to tap the tongue end of the second board to ensure a tight fit. Never use the hammer or rubber mallet directly on the floor as this will cause damage to the board.
|
| |
|
| |
|
| |
|
| |
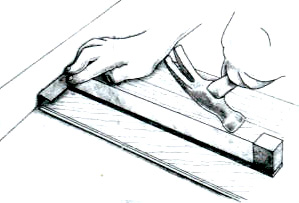
Continue placing additional boards moving right to left using the same procedure until the first row is complete. You will need to cut off the end of the final board, save the remaining piece for the next row as long as it is as least 12” long. Use the late board puller to ensure the last board is tight against the preceding board. Place shims between the end of the last board and the wall. Use the shims to wedge the row tight rendering it immobile.
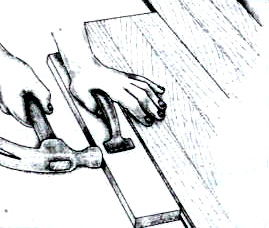
Carefully top nail the first row of boards to the sub-floor ONLY using 6d finish nails where the boards meet the wall. Place the nails as close to the edge of the boards as possible so they will be covered by the transition and/or wall molding. If this cannot be done, set the nails with a nail punch and fill holes with wood filler. Finish nails should be done along the wall. Now side nail with the flooring stapler through the tongues of the first row at 8” intervals and 2-3” from the end of each board. |
| |
|
| |
Second and Subsequent Rows
Start each new row on the right side with the remaining portion of the previous row as long as it is at least 12” long. Otherwise cut a new starter board.
The end joint must be at least 16” from the end joint in the row before it. When maintaining the 16” offset of all end joints, the pattern should not repeat itself until the 4th or 5th row. Glue the short end groove of the next board and place in position, march the tongue and groove at the end only.
Then, beginning at the opposite end of the board, tap the board onto the previous board with the tapping block. Move the tapping block along the board until it connect with the previous board, making sure that the end of the board is tightly joined to the other board. If it is not you can not get it tight once the long seam is tight.
Continue with additional boards and cut the last board to fit using the last board puller to install the last board tight. Make sure that the first board of any row is at least 12” long and maintain the end joint offset at least 16”. |
| |
|
| |
 |
Continue with additional boards and cut the last board to fit using the last board puller to install the last board tight. Make sure that the first board of any row is at least 12” long and maintain the end joint offset at least 16”. |
|
| |
|
| |
Last Row:
The entire length of the last row in many cases will need to be cut to fit into the remaining space while allowing for the ½” expansion space.
The last board puller will be used in install the last row and you need to top nail the row with finish nails as was done with the first row. |
 |
|
| |
|
| |
GLUE DOWN HARDWOOD FLOORING INSTALLATION:
Begin installing the first row in the right corner of the base wall. Install the first board so the short groove side is against the ½” expansion shim to the right and the long groove is against the ½” shim in front of you. Always dry fit the first row before you begin gluing the boards down.
Once the first row has been cut and fitted, remove the flooring and snap a chalk line ½” out from the starting wall. Starting from the chalk line, apply an even layer of adhesive as per manufactures instructions. Only spread the adhesive the width and length of the first row that was dry fit. |
| |
Re-install the pre-cut boards from the dry fit and apply tongue and groove glue to the end of the second board. Connect the end of the second to the end of the first board and make sure the end are tightly connected and firmly positioned against the shims. Use the hammer/rubber mallet and the tapping block to tap the tongue end of the second board to insure a tight fit. Continue placing the rest of the boards moving right to left using the same procedure until the first row is completed. For best results, allow the tongue and groove and the adhesive on the sub-floor to dry before continuing the installation. |
 |
|
| |
|
| |
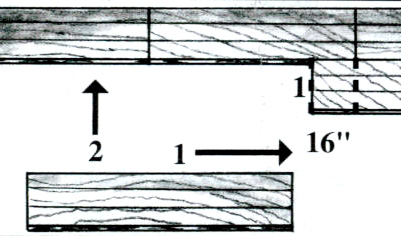 |
Start each new row on the right side with the remaining piece of board from the previous row as long as it is at least 12” long. Otherwise you must cut a new starter board. The end joint must also be at least 16” from the end joint of the row before it. Trowel adhesive onto the sub-floor as recommended. Glue the short end groove of the next board and position it matching tongue and groove at the end only then using the tapping block tap the board onto the other board making sure that the end joint is tight because when the long side is done you can not be able to do so. |
|
| |
|
| |
The entire length of the last row in most cases will need to be cut to fir into the remaining spaces while allowing for the ½ “expansion space. The last board puller will be used to install the last row. |
| |
|
| |
|
| |
|
| |
STEP 5:
Installation Through Doorways and Between Rooms
If the doorway/passageway is less than 42” in width, a t-molding must be placed in the doorway/passageway to separate the two floors. |
| |
|
| |
Pipes, Floor Vents and Other Objects
Each case is unique, the general rule is to carefully measure before you cut and remember to level the ½” expansion space. Expansion space will be covered with pipe rings or molding when the installation is completed. |
 |
|
| |
Molding and Floor Vents
Complete the installation by allowing the tongue and groove adhesive to dry as specified on the bottle. Remove the expansion shims and install floor vents, transition molding and wall molding as needed. See your dealer/distributor for available products.
Maintenance
Floor the floor care guide and warranty information for proper care, protection and maintenance of your hardwood floor. |